 |
1) |
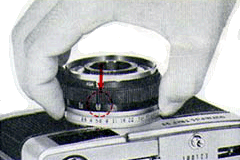
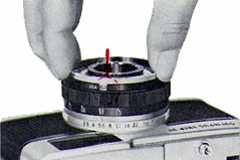
Set the camera to manual system Turn the F stop ring to move the "A" mark (AUTO) off the red line marked in front of viewfinder. The Auto system is switched to manual system. Set any one of the F numbers to the red line. The shutter can be released freely regardless of light condition. |
 |
2) |
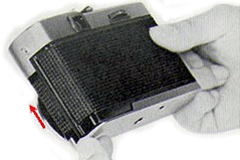
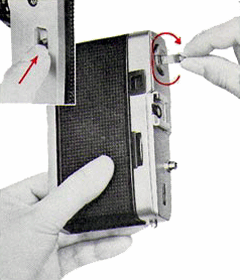
Open the rear cover Pull out the rear cover lock. The cover will open automatically. |
 |
3) |
Load the camera with film Pull out the rewinding knob. Put the film cassette into the film compartment. Push the rewinding knob in. If the knob cannot be pushed in completely, turn it slightly clockwise or counter-clockwise, while maintaining pressure. |
 |
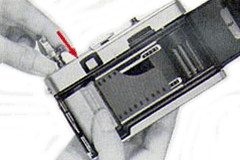
4) |
Engage the film end with the take-up spool Hold the camera firmly with your left hand and hold the film cassette with the thumb of the left hand. With the right hand, pull out the film end to such an extent that it reaches the take-up spool. Insert the end of the film into any of the six slots on the take-up spool. |
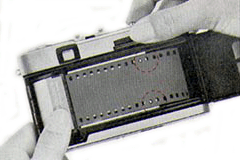 |
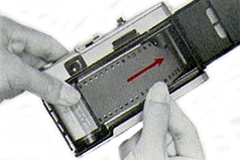
5) |
Before closing the rear cover Be sure that the gear teeth on the sprocket spool engage the perforations of the both sides in the film, winding the film on to the take-up spool. Close the cover. |
 |
6) |
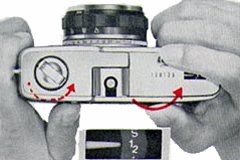
Check the film counter Wind the film and release the shutter button. Repeat this motion two or three more times until the film counter shows the number "1". From this point, start taking pictures. Whenever you wind the film, be sure you wind it all the way. Never wind it half way or part way, but all the way. If the rewind knob turns during the repeated motion, this shows that the film is being advanced properly. |
 |
7) |
ASA film speed setting Rotate the ASA setting ring in front of the lens barrel until the ASA number of the film being used appears in the ASA window. When using ASA 32 film, you may set the ASA 40 dot. |
 |
8) |
Set the camera to Auto system Turn the F stop ring until the "A" mark clicks and stops at the red line. |
 |
9) |
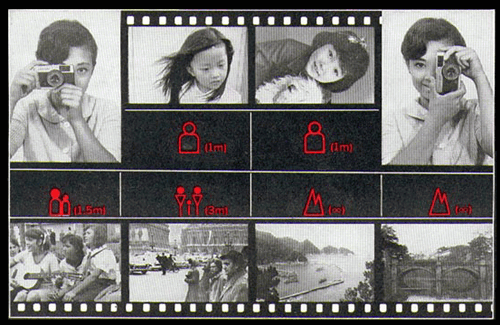
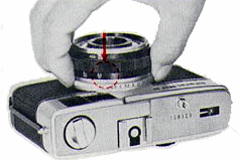
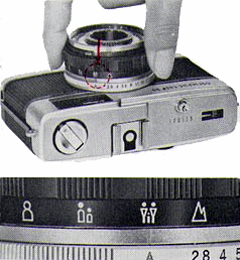
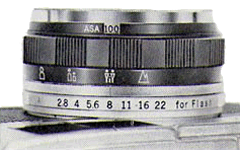
Focussing The focussing ring has distance symbols (yellow) and scales in two different colours: white (metres) and yellow (feet). Take an approximate distance between your camera and the subject and set the appropriate distance symbol to the red line by rotating the focussing ring. A small window is incorporated in the viewfinder (the lower right hand side), in which the distance symbol will appear as you turn the focussing ring. This permits to set the distance symbol while looking through the viewfinder. For flash photography and/or for critical focussing, use the metre or foot scale provided on the lower part of the focussing ring. Simply set appropriate scale number to the red line. Remarks: The focussing ring rotates within the range of distance symbol and metre/foot scale mark respectively, but DOES NOT rotate 360°. |
 |
10) |
Compose the picture and release the shutter Hold the camera firmly. Look through the viewfinder and place the subject in the centre of the frame. Press the shutter release button with the flat part of the index finger, but NOT with the tip of the finger. When making close-ups (portrait distance symbol or 1 metre or closer), frame the subject in the area enclosed by 3 small indices in the frame. When the subject is too dim the shutter can not be released, and a red warning mark comes up in the viewfinder. If you see this signal, simply move the subject to an area that has more light, or perform flash photography. |
 |
11) |
Rewind the film When a roll of film is completely exposed, rewind the film. DO NOT attempt to advance the film. The film is completely exposed wen the film counter indicates the number 36, 20 or 12 depending on the length of film used. Press the rewind button on the bottom of the camera body. Lift the rewind crank and turn it in the direction of the arrow. The crank is tight while the film is being rewound, but when the end of the film leaves the take-up spool, the crank will become loose. Open the rear cover and pull out the film rewind knob. Then remove the film, keeping it away from direct sunlight. |
 |
1) |
Flash photography The use of either flash bulbs or an electronic flash is recommended, if red warning signal appears in the viewfinder. We recommend you our compact style Pen Flash CL which accepts AG-1 and AG-1B (for colour photography) or AG-3N. |
 |
2) | Set the camera to manual system by turning the F stop ring (see "1" in preceding page). Set the F number instructed on your flash bulb package. The shutter speed is automatically set at 1/40 sec. |
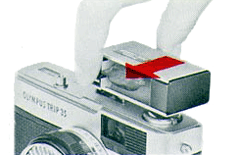 |
3) | The Olympus Pen Flash CL can be connected simply by slipping its foot on to the accessory shoe (incorporate the cordless contact) provided on top of the camera. To obtain proper lens opening, which is calculated by camera-to-subject distance, please refer to the exposure chart provided on the rear of the flash unit. |
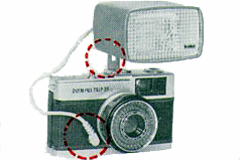 |
4) | When using ordinary flash gun or electronic flash, slip the foot of the unit on to the accessory shoe and attach the flash connecting plug to the synchronising socket on the camera. |
Technical data and camera characteristics
| Film size: | 24 X 36mm |
| Lens: |
D Zuiko F2.8 f=40mm 4 elements in 3 groups |
| Shutter: |
Programme system Automatic 1/40 sec or 1/200sec Manual 1/40 sec X syncro contact Self shutter release button locking system for under exposure |
| Lens opening: |
Automatic Diaphragm automatically moves from F2.8 to F22 Manual For flash photography from F2.8 to F22 |
| Viewfinder: | Luminous bright frame finder (Magnification 0.55) with parallax correction mark and zone focus marks |
| Film loading: | EL (Easy Loading) system |
| Film winding: |
Thumb winding at camera rear Self-cocking to prevent double advances and double exposures |
| Film counter: | Exposed counting, self-setting type |
| Film rewinding: | Crank type with rewinding button setting system |
| Focussing: | Zone focussing system (4 position setting) with distance scale in metre and foot |
| Exposure meter: |
Automatic exposure adjustment by built-in electric eye meter Light measuring range EV 8.32-EV 17.14 (ASA 100) |
| Film speed setting: | ASA 25-400 |
| Filter size: | 43.5mm (screw-in) |
| Rear cover operation: | Hinge type |
| Accessory shoe: | Cordless flash contact |
| Size & weight: |
116 (width) x 70 (height) x 57 (depth) mm, 410g 41/2" (width) x 23/8" (height) x 21/4" (depth), 141/8 oz |