![]()
THE PENTAX AUTO 110 SYSTEM
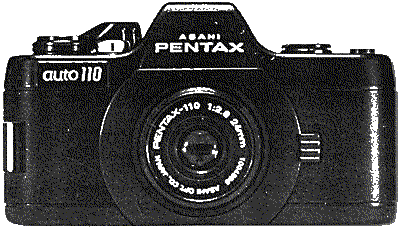
The Pentax AUTO 110 is a fully automatic SLR (single-lens reflex) camera designed along the lines of the popular 35mm SLR. Fully pocketable with the standard lens attached, the AUTO 110 combines the compactness and easy cartridge loading of the 110 film format with many of the systems advantages and versatility of the latest 35mm SLR cameras. The variety of system accessories available include the battery-powered 110 winder, the AF 130P Auto Flash, interchangeable lenses, close-up attachment lenses, filters and other special purpose attachments. In addition to the Pentax-110 24mm f2·8 standard lens interchangeable lenses available include the Pentax-110 18mm f2·8 wide-angle lens (approx. equal to a 35mm wide-angle in the 35mm format) and the Pentax-110 50mm f2·8 telephoto (approx. equal to a 100mm telephoto in the 35mm format). Close-up lenses include S31 and S16 for the standard lens; W21 for the wide-angle; T26 and T43 for the telephoto; UV and skylight filters are also avaiable for the standard and wise-angle lenses. Other accessories include assorted cases for the camera and attachments, individual lens hoods, lens caps, body cap, a special tripod adaptor and eyesight correction lenses.
Appearing as the world's smallest and lightest SLR, the Pentax AUTO 110 welcomes you to its world of pocketable pleasure.
CONTENTS
Specifications
Description of parts
Battery loading
Film loading
Focusing
Basic shooting instructions
Lens changing
AUTO 110 SPECIFICATIONS
| Type | TTL metering 110 SLR camera with bayonet mount for interchangeable lenses. | ||||
| Film Type | Cartridge loading 110 film. | ||||
| Negative Format | 13mm x 17mm. | ||||
| Lens | Pentax-110 24mm f2·8; 47 degree angle of view; 25·5mm filter threads. Focusing range: 0·35m-∞. | ||||
| Lens Mount | 110 bayonet mount; 80 degree setting angle; features shutter lock provision. | ||||
| Viewfinder | Eye-level pentaprism finder with quick-return mirror. | ||||
| Focusing | Central split-image focusing spot surrounded by matte field. | ||||
| Viewfinder Information | Green LED indicates adequate shutter speed (minimum of 1/30 sec. at f2·8); yellow LED indicates slow shutter speed (less than 1/30 sec.) requiring use of a tripod or auto flash to avoid camera shake. Magnification: 0·75X showing 87% of picture area. | ||||
| Battery Check | Viewfinder LEDs fail to light on depressing shutter button when batteries are low. | ||||
| Exposure Metering | Centre-weighted, TTL metering at full aperture via SPD cell. EV range: 3-17 (24mm f2·8 lens; ASA 100). | ||||
| Film Speed Setting | Automatic set available for 110 films. | ||||
| Shutter | Programmed electronic behind-the-lens shutter. | ||||
| Shutter-Speed/ Aperture Range | 1/750 sec. at f/13·5 - 1 sec. at f/2·8. | ||||
| Film Advance | Two 45-degree stokes of film advance lever advance film a single frame; 60-degree pre-advance setting. | ||||
| Exposure Count | Frame number appears in back cover window. | ||||
| Other features | Synch terminal for automatic flash synch with AF 130P auto flash unit at 1/30 sec. (f/2·8); tripod socket, lens release button, wrist strap hook, battery holder tray; winder capability. | ||||
| Power Source | Two 1·5V silver-oxide batteries (G 13). | ||||
| Size |
| ||||
| Weight |
|
AUTO 110 DESCRIPTION OF PARTS
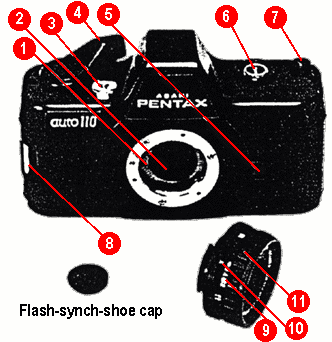 |
1. | 110-Bayonet Mount | |
| 2. | Aperture diaphragm | ||
| 3. | Shutter release button | ||
| 4. | Film advance lever | ||
| 5. | Lens release button | ||
| 6. | Flash synch-shoe | ||
| . | Flash contact pin | ||
| 8. | Wrist strap hook | ||
| 9. | Lens distance scale | ||
| 10. | Distance scale | ||
| 11. | Focusing ring | 15. | Battery chamber |
| 12. | Shutter/mirror box module | 16. | Battery holder tray |
| 13. | Viewfinder eyepiece | 17. | Back cover window |
| 14. | Film cartridge chamber | 18. | Winder contact terminals |
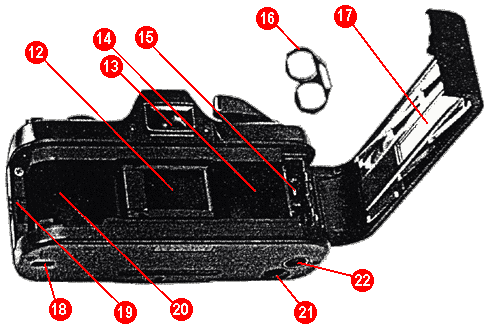 | |||
| 19. | Back cover lock | 21. | Film drive coupler |
| 20. | Film cartridge chamber | 22. | Tripod socket |
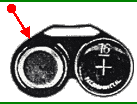
BATTERY LOADING
Depress the back cover lock, open the back cover and remove the battery holder tray from inside the battery chamber.
Insert the (-) side of one of the batteries into the opened side of the tray.
Then, turn the tray over and do the same with the other battery. The (-) side of both batteries will correspond with the (-) indication on top of the tray when inserted properly.
Insert the loaded tray - curved side first - back into the battery chamber. Proper contact will be made no matter which battery is on top as long as batteries have been inserted into the tray properly.
Battery Check
Under normal usage, one set of batteries will last approximately one year or operate the electronic shutter approximately 10,000 times. If batteries are inserted improperly, or if they have become worn, the LED indicator lamps in the viewfinder will fail to light when you depress the shutter release. If batteries are worn, replace with G 13 silver oxide batteries (EverReady S76E or equivalent).
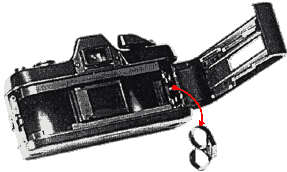
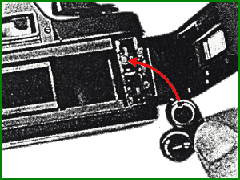
FILM LOADING
The Pentax AUTO 110 automatically preselects the film speed for both ASA 80 and ASA 400 films; no film speed setting is required.
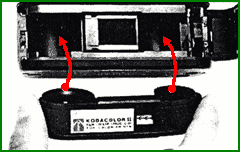
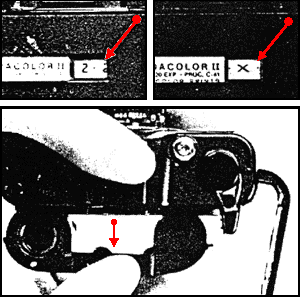
1. Insert the film cartridge as illustrated.
2. Close the Back Cover.
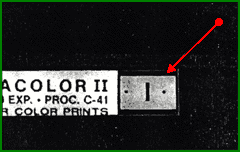
3. Turn the Film advance lever about 7 times until the numeral "1" appears in the back cover window. You are now ready to take your first picture.
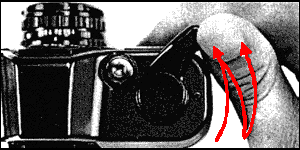
FOCUSING
| Look through the viewfinder eyepiece and turn the focusing ring of the lens to bring the image into focus. Reasonably sharp focus can be obtained by focusing on any part of the focusing screen. To be assured of pinpoint focusing, however, check your focus against the spot in the centre of the screen, If the image is completely intact, focus is precise. If the image is split or broken, however, adjust the focus until both halves of the image fit together perfectly. For those who find focusing difficult because of poor eyesight, etc., eyesight correction lenses (covering a range from -5 to +3 diopters) are available as accessories for the AUTO 110. |
  |
BASIC SHOOTING INSTRUCTIONS
Before Shooting

1 Depress the shutter release button halfway. Either a green or a yellow diode light will come on inside the viewfinder.
If the green light-emitting diode (or LED) lights, correct exposure will be obtained without use of flash or a tripod.
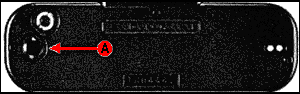
2 If the yellow LED lights, it signifies that light is insufficient to obtain correct exposure unless the accessory electronic flash unit or a tripod is used. (If you use a tripod, fix the tripod to the tripod socket A at the base of the camera. For instructions on the use of electronic flash, refer to the "AF 130P Auto Flash" section of this manual.)
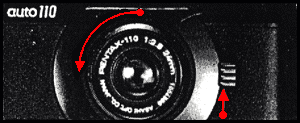
Shutter Cocking
Turn the film advance lever two full strokes to cock the shutter. The shutter is now ready to release.
Film Advance
Each time you recock the shutter after tripping it, the film will advance and the back cover window will egister the next number - 2 - 3 - 4 and so forth until the end of the roll.
At The End Of The Roll
1 Depending on the film cartridge loaded in the camera, the last exposure will be either "12" or "20". In both cases, an "X" will appear in the window after the last exposure. Continue advancing the film three or four more turns beyond the "X" or until the film ends.
(CAUTION: When the film advance lever no longer advances, you have reached the film end. Stop winding and do not attempt to force the lever to avoid breakage.)
2 Open the back cover and remove the film cartridge by turning the camera upside down and tapping lightly
LENS CHANGING
Three interchangeable lenses are available for the AUTO 110 which bayonet into the lens mount at the front of the camera to enable a wide variety of shooting possibilities. In addition to the 24mm f/2·8 standard lens, an 18mm f/2·8 wide-angle lens and a 50mm f/2·8 telephoto lens are available.
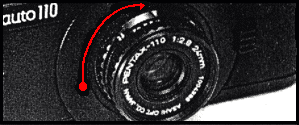
Lens Removal
Push upwards on the lens release lever and turn the lens approximately 90 degrees to the left until the lens slips out of the mount.
Lens Mounting
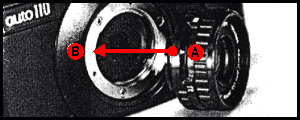
Match up the red distance scale index of the lens A with the red dot on the camera body B and insert the lens into the body.
Turn the lens to the right until it locks in place, with the red distance scale index positioned at the top.


WHEN TO USE THE FLASH
The Pentax AF 130P auto flash unit was designed exclusively for use with the AUTO 110 in situations where lighting is insufficient for correctly exposed photographs. As a rule, use either the AF 130P or a tripod when the yellow indicator in the viewfinder lights, indicating a low light reading. These occasions are principally outdoors at night or indoors in dim lighting. Use of a flash is required less frequently with high-speed ASA 400 film than with ASA 100.
Do not use the flash when the green LED lights in the finder, in which case over-exposure will result.